一分钟用HCaaS搭建Frp内网穿透
前言
对于内网穿透大家并不陌生,不管你是小白还是开发者都需要一些内网穿透服务,如果自己购买服务器苦恼于带宽小(国内主机商普遍都是1M~10M),从而导致穿透效果并不是很理想,最近博主一直在关注网银互联公测的HCaaS,由于带宽比较高,如果搭建内网穿透在容器里,速度就很理想,本教程旨在最简单的方法利用HCaaS搭建一个内网穿透,如果你对Frp内网穿透不了解,可以移步我的早期一篇文章《内网穿墙利器frp,实现无公网IP穿透(支持windows+linux)》
准备
- 能上网的 PC 一台
- LinkCloud-HCaaS帐号一个,注册地址:
https://cubepaas.com/?spread=4fab48c896ee4879bb5c0416bf09e7f2fugq4wt3c4
- 域名一个(可选)
开始搭建
- 登录HCaaS帐号,https://cubepaas.com/
- 选择工作负载-右上角选择部署服务
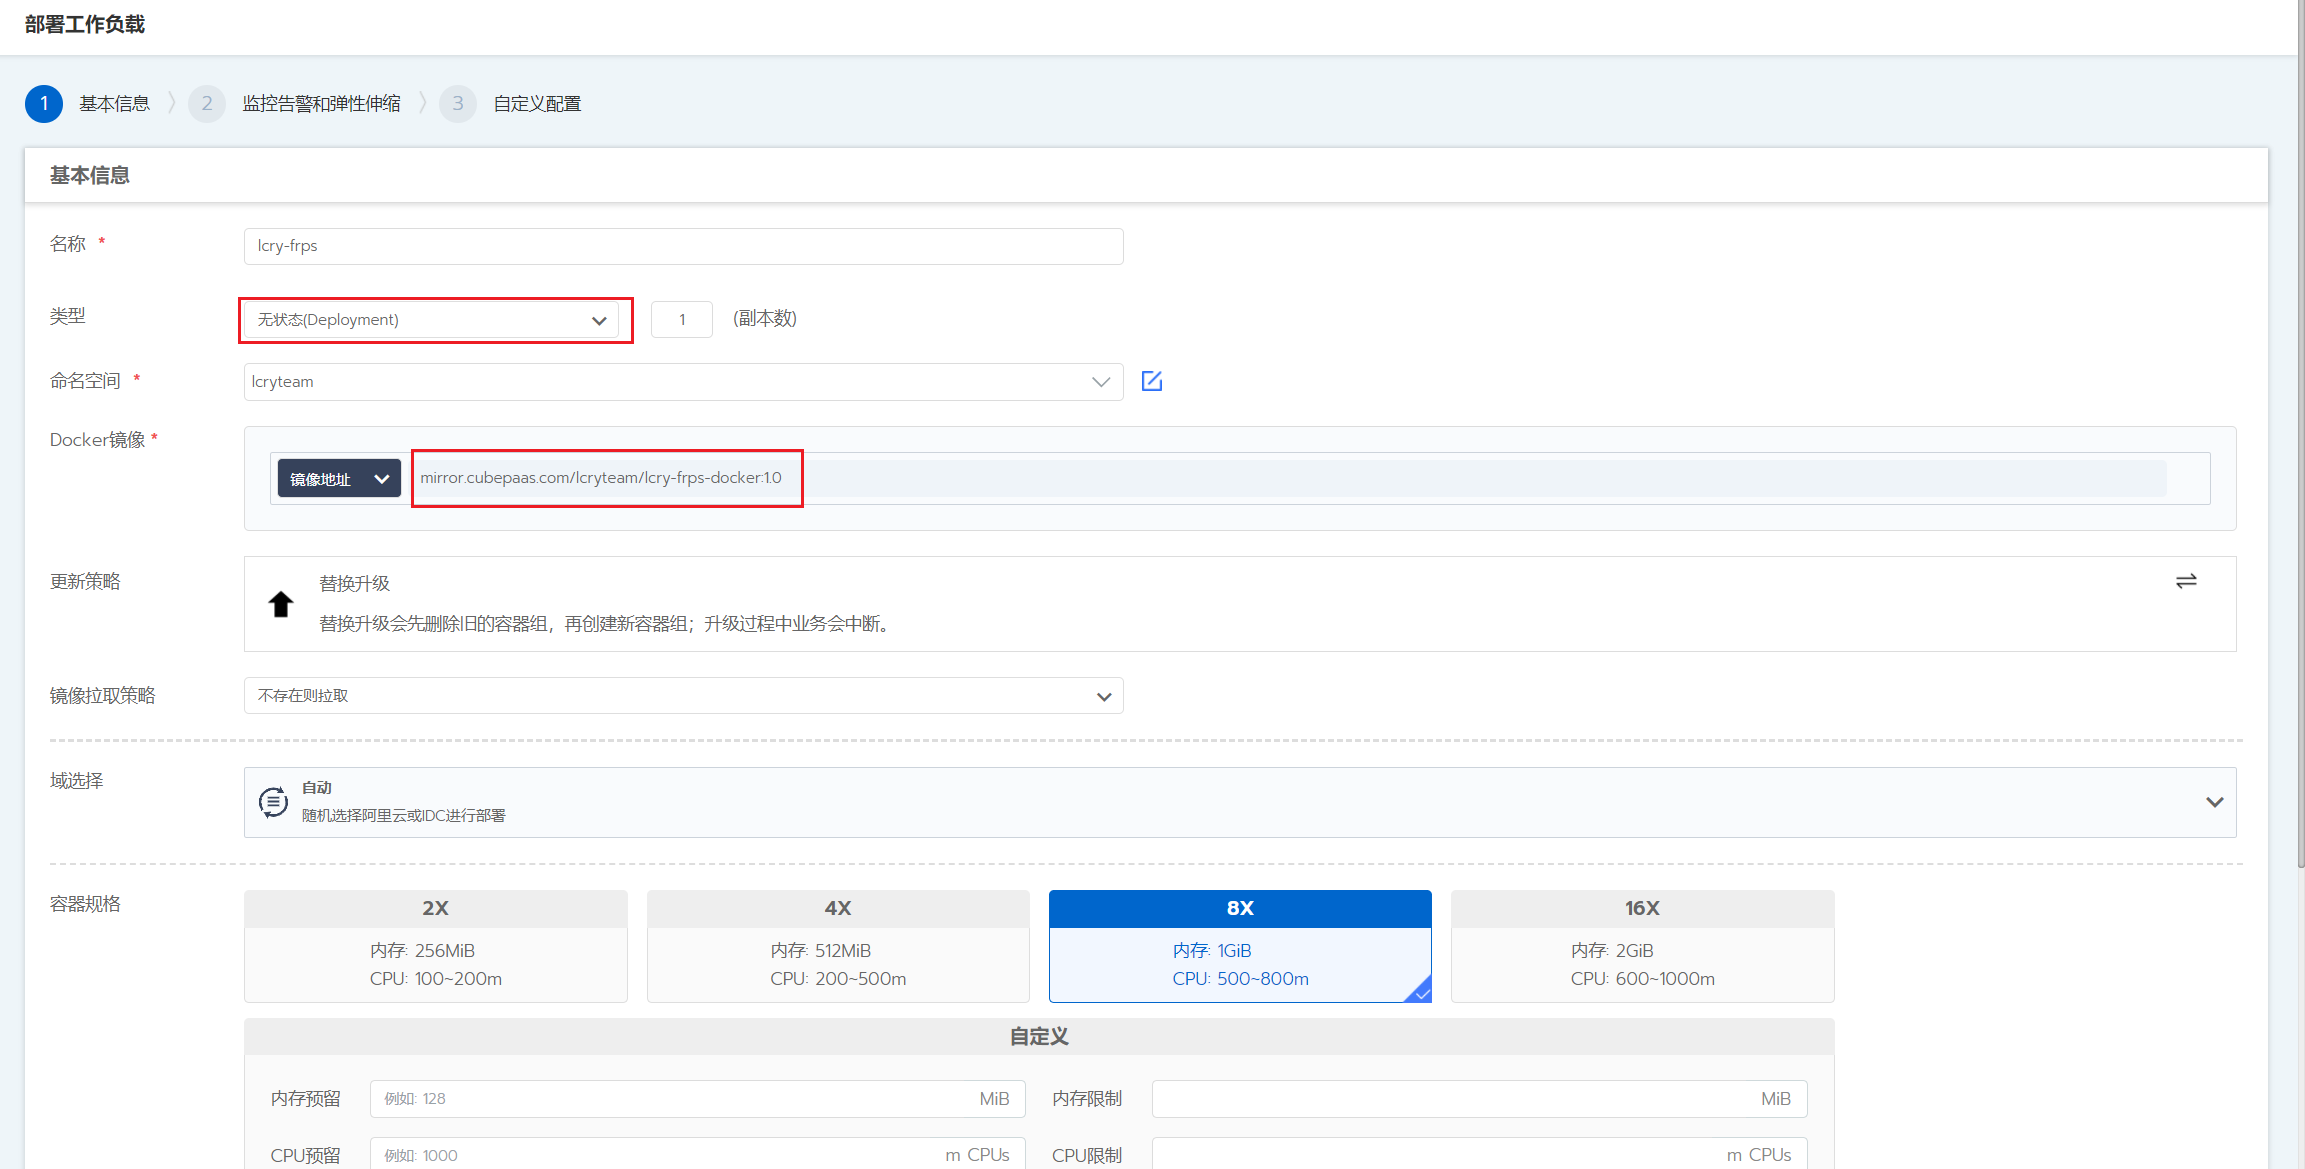
按照下图进行操作即可
- 名称:随便取
- 类型:无状态
- 命名空间:默认
- Docker镜像:选择镜像地址,地址填写:
mirror.cubepaas.com/lcryteam/lcry-frps-docker:1.0 - 更新策略:滚动升级或者删除容器时更新
- 镜像拉取策略:不存在则拉取
- 域选择:自动(强烈推荐自动->官网的资源紧缺)
- 容器规格:可以2H4G或者其他自己自定义
端口映射:要暴露的端口一个一个的对应
- 容器端口:80 、协议:TCP 、网络模式:L4层负载均衡器、节点监听端口:80(必须)
- 容器端口:443 、协议:TCP 、网络模式:L4层负载均衡器、节点监听端口:443(必须)
- 容器端口:5443、协议:TCP 、网络模式:L4层负载均衡器、节点监听端口:5443(必须)
- 容器端口:5444、协议:TCP 、网络模式:L4层负载均衡器、节点监听端口:5444(必须)
- 容器端口:5445、协议:TCP 、网络模式:L4层负载均衡器、节点监听端口:5445(必须)
- 其他你需要使用的端口自行添加、...
- 直接点击部署,稍等片刻点击工作负载,好了之后一定要点击一下重启容器!!!
访问frps服务端控制台:http://IP:5445
登录帐号:
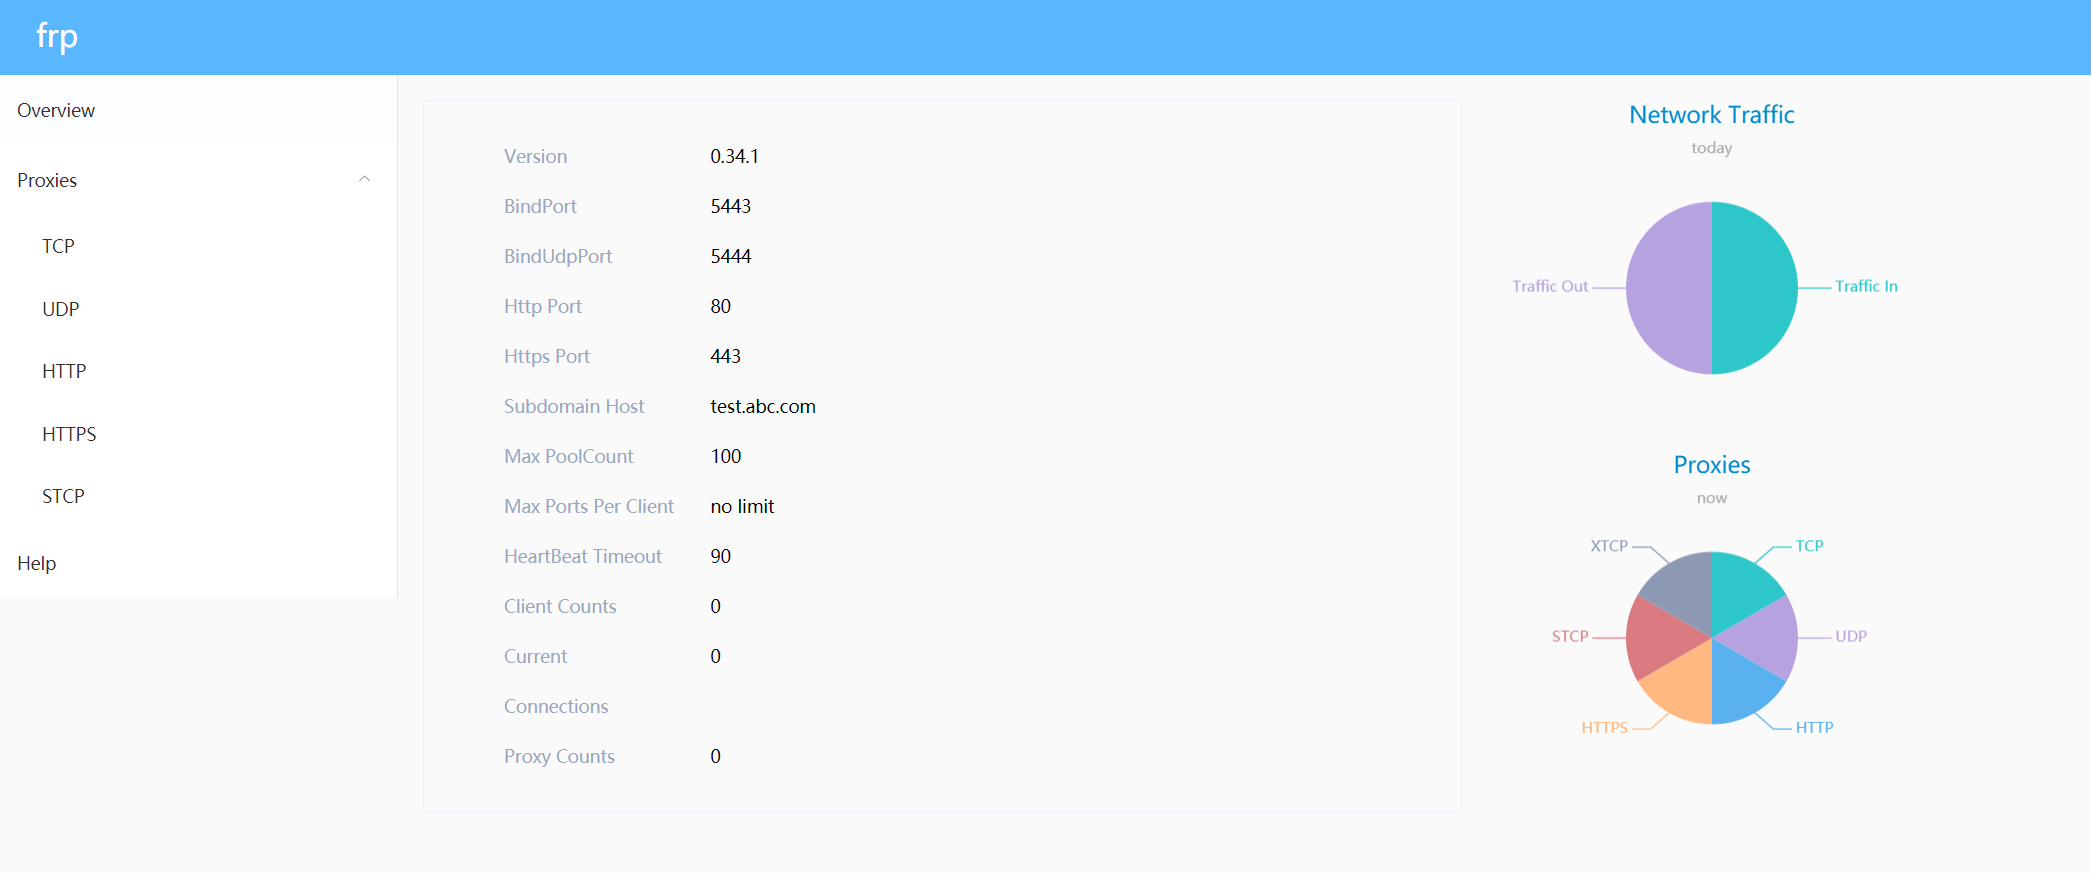
admin、密码:lcry访问80端口提示下方页面证明搭建成功
个性化配置
1、镜像中默认端口如下:
80(TCP) http穿透的端口
443(TCP) https穿透服务的端口
5443(TCP) frps服务端口
5443(UDP) KCP加速端口
5444(UDP) udp端口帮助udp洞洞穿NAT
5445(TCP) frps控制台端口
需要修改frps配置文件请修改容器内 frps.ini 配置文件,配置文件在容器/etc/frp/目录下,默认配置如下:
[common]
# A literal address or host name for IPv6 must be enclosed
# in square brackets, as in "[::1]:80", "[ipv6-host]:http" or "[ipv6-host%zone]:80"
bind_addr = 0.0.0.0
bind_port = 5443
# udp port to help make udp hole to penetrate nat
bind_udp_port = 5444
# udp port used for kcp protocol, it can be same with 'bind_port'
# if not set, kcp is disabled in frps
kcp_bind_port = 5443
# specify which address proxy will listen for, default value is same with bind_addr
# proxy_bind_addr = 127.0.0.1
# if you want to support virtual host, you must set the http port for listening (optional)
# Note: http port and https port can be same with bind_port
vhost_http_port = 80
vhost_https_port = 443
# set dashboard_addr and dashboard_port to view dashboard of frps
# dashboard_addr's default value is same with bind_addr
# dashboard is available only if dashboard_port is set
dashboard_addr = 0.0.0.0
dashboard_port = 5445
# dashboard user and passwd for basic auth protect, if not set, both default value is admin
dashboard_user = admin
dashboard_pwd = lcry
# dashboard assets directory(only for debug mode)
# assets_dir = ./static
# console or real logFile path like ./frps.log
log_file = ./frps.log
# trace, debug, info, warn, error
log_level = info
log_max_days = 7
# auth token
token = www.51it.wang
# heartbeat configure, it's not recommended to modify the default value
# the default value of heartbeat_timeout is 90
# heartbeat_timeout = 90
# only allow frpc to bind ports you list, if you set nothing, there won't be any limit
#allow_ports = 2000-3000,3001,3003,4000-50000
# pool_count in each proxy will change to max_pool_count if they exceed the maximum value
max_pool_count = 100
# max ports can be used for each client, default value is 0 means no limit
max_ports_per_client = 0
# authentication_timeout means the timeout interval (seconds) when the frpc connects frps
# if authentication_timeout is zero, the time is not verified, default is 900s
authentication_timeout = 900
# if subdomain_host is not empty, you can set subdomain when type is http or https in frpc's configure file
# when subdomain is test, the host used by routing is test.frps.com
subdomain_host = test.abc.com
# if tcp stream multiplexing is used, default is true
常见问题
1、为啥部署好了访问不了?
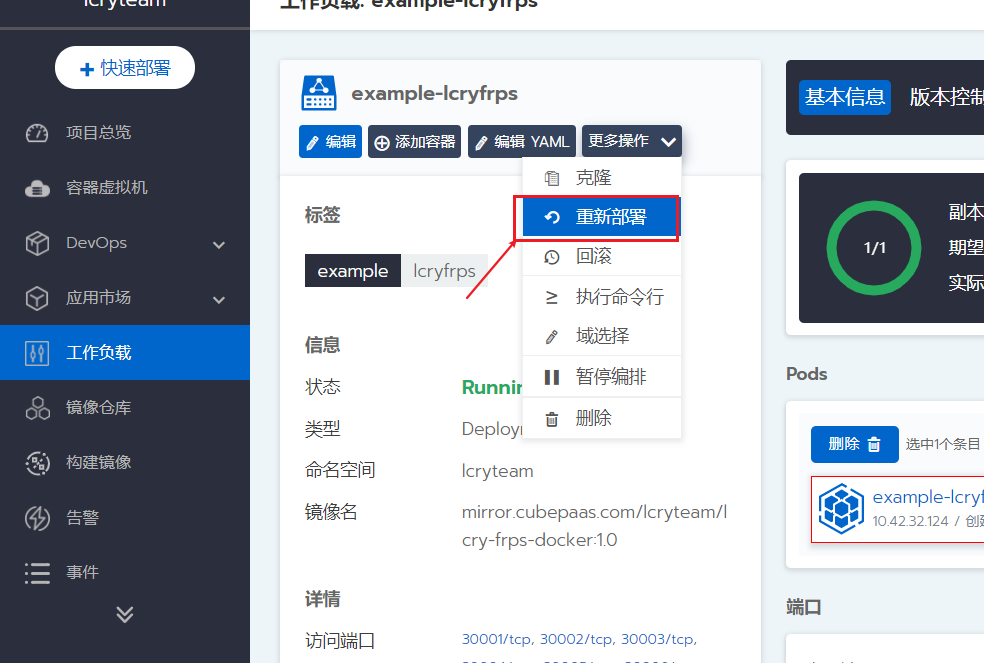
答:部署好了一定要点击重新部署一下初始化参数,如下图:
2、为啥frps.ini配置文件啥都没有?
答:先重新部署试试,不行的话把上方默认配置文件粘贴到/etc/frp/frps.ini中
3、如何批量开多端口?
答:了解yaml语法,直接创建端口,但是有一定问题,不推荐使用,后面可以单独出个教程。
若还有其他问题评论留言~
商业转载请联系作者获得授权,非商业转载请注明本文出处及文章链接


